If you ask folks their favorite part about owning a vehicle of any kind, it’s highly unlikely they’ll answer with “working on the wiring!”.
But as many owners know all too well, there may come a need for some electrical troubleshooting if your machine experiences no-start or no-spark issues.
When experiencing these issues, many owners are able to trace them back to their CDI Box and ignition system. And if the CDI Box is the culprit, it will likely need to be replaced which will require rewiring the new unit.
This guide will explain what the CDI system does, the components and wiring of the CDI Box, and show how to connect it to the ignition system by way of a 5 Pin CDI Box Wiring Diagram, complete with detailed photos and descriptions.
Table Of Contents
I. What is a CDI System?
II. How a CDI Works
III. The 5 Pin CDI Box
IV. Connecting The 5 Pin CDI Box
– Timing Trigger
– Ignition Coil
– Kill Switch or Key Switch
– CDI Ignition Power
– Ground
VI. 5 Pin CDI Wiring Diagram
– AC CDI Box or DC CDI Box?
– AC CDI Box
– DC CDI Box
VII. Conclusion
What Is A CDI System?
The Capacitor Discharge Ignition (CDI) is an electronic ignition device used in many motorcycles, scooters, ATVs, UTVs, Go-Karts, lawnmowers, and outboard motors. It is the most important part of the ignition system.
The CDI system is responsible for storing an electrical charge and then discharging it through the ignition coil. When discharged, a spark is produced from the spark plug(s) in the gas engine, leading to the engine starting up.
How A CDI Works
A tiny signal current is transmitted from the timing trigger (also known as a pulse generator) into the CDI Box, alerting it that a spark is needed.
The thyristor then switches on and electricity flows from the CDI Box to the ignition coil, and then onto the spark plug giving it a spark.
Once the capacitor has discharged all of this electricity, the thyristor shuts off the flow.
The 5 Pin CDI Box
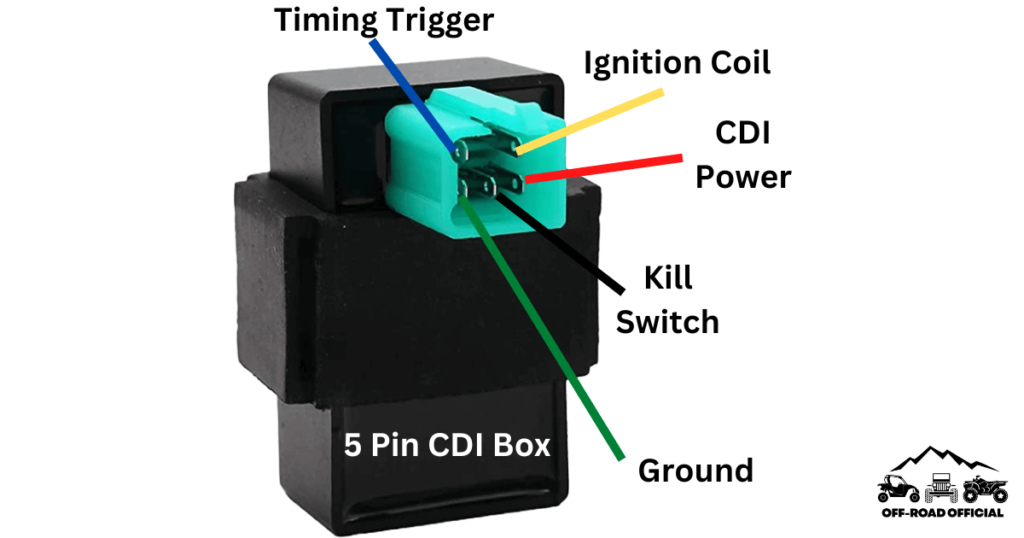
The 5 Pin CDI comes in the form of a black box, fitted with a male connector at the top. Inside of this male connector, there are five different pins that connect to the various parts of the ignition system to provide power to the machine.
These five pins connect the timing trigger/pulse generator, ignition coil, ignition power to the CDI, kill switch/key switch, and the ground.

Connecting The 5 Pin CDI Box
The CDI Box is connected by way of the wiring harness. The wiring harness has a female connector containing five different wires that plugs into the male connector of the CDI Box.
Once connected, the wiring harness then connects the CDI Box with the remaining parts of the ignition system via a series of additional connector heads and wires.
The remaining wiring that needs to be connected includes that of the timing trigger, the ignition coil, the kill switch or key switch, the CDI ignition, and the ground wire.

Timing Trigger
The timing trigger, otherwise known as the pulse generator, is responsible for sending an initial signal current to the CDI Box to let it know a spark is needed. This current is then sent to the ignition coil.
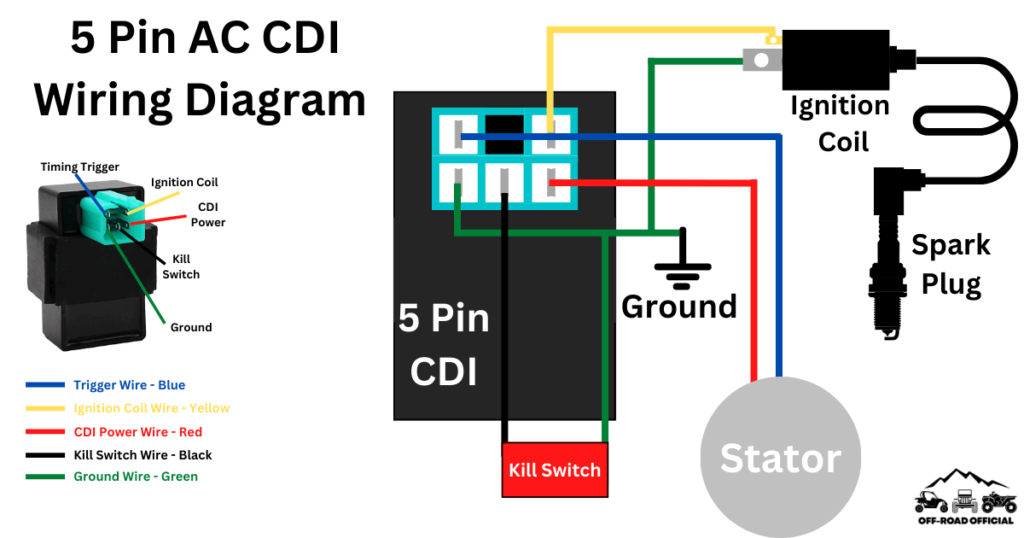
The timing trigger wire is generally blue or blue/white in color, and connects to the same colored wiring located on the stator, which generally sits on the right side of the engine.
Ignition Coil
The ignition coil serves to discharge the electrical charge generated and sent by the timing trigger. The ignition coil connects to the spark plug, with this electrical discharge resulting in a spark from the spark plug.
The ignition coil wire is usually yellow or yellow/black in color and connects to the same colored wiring from the wiring harness. A green grounding wire connects to the ignition coil from the wiring harness as well.
Kill Switch or Key Switch
The potential connection to the kill switch or key switch on your vehicle depends upon the type of CDI Box you use. An AC CDI Box will offer a connection to either of these switches while a DC CDI Box will not.
The kill switch wire is generally black or black/white in color. This wire connects to the wiring harness via the wire of the same color. A green grounding wire also connects to the kill switch from the wiring harness.
CDI Ignition Power
The CDI Ignition Power wire supplies the power needed for the CDI Box to function. This power is supplied from the battery using a DC CDI Box or the alternator using an AC CDI Box.
This wire is generally red or red/black in color and connects to the same colored wiring located on the stator.
Ground Wire
The main ground wire is usually green in color and connects to the same colored wiring located on the ground, usually found on the stator or main body of the vehicle. Additional green ground wires also extend from the wiring harness to the ignition coil and kill switch or key switch.

5 Pin CDI Wiring Diagram
Below is the full 5 Pin CDI Wiring Diagram for an AC CDI Box.

Conclusion
For owners who find that the CDI Box in their vehicle needs to be replaced, it can seem like a daunting task to complete on your own.
However, you’ll just need to use the 5 Pin CDI Wiring Diagram and other photo guides above to assist you with the installation. Even for owners with little to no electrical experience, successfully installing the new CDI Box can be achieved using this guide for assistance.


