One of the most important parts of the ignition system in Polaris vehicles is the CDI box.
But these CDI boxes don’t last forever, and replacing them can be a little tricky as Polaris uses different types of CDI boxes for different makes and years.
Throw in the need to rewire a new CDI unit, and this whole CDI box mess can get a little overwhelming.
No worries, though. This guide will help distinguish between the different types of CDI boxes used by Polaris and the different types of replacements available.
It will also show how to connect the CDI box to the ignition system by way of a Polaris CDI wiring diagram.
CDI System
Let’s start with a brief overview of the CDI system and its role.
The Capacitor Discharge System (CDI) is responsible for storing an electrical charge and then discharging it to create a spark at the spark plug.
Without a properly functioning CDI system, you’ll get no spark and your engine won’t start.
Different Types of CDI
There are two different types of CDI system, with Polaris vehicles making use of both types.
And there are two main types of CDI boxes, with Polaris making use of both types of those as well.
AC & DC CDI Systems
Most Polaris ATV and UTV models use a DC CDI box. The DC CDI box relies on the vehicle’s 12-volt battery for power via direct current.
If you own an electric-start Polaris model manufactured in the last 15 years or so, you can be pretty sure its CDI box is of the DC variety.
But some older Polaris models do use an AC CDI box. The AC CDI box gets its power solely from the alternator in the form of alternating current.
Key Differences in AC & DC CDI Boxes:
- AC CDI box usually smaller in size than DC CDI box
- Vehicle’s lights come on when turning on ignition using a DC CDI box, but usually don’t when using an AC CDI box
- AC CDI box usually wired to a kill switch, while DC CDI box usually wired to a key switch
5 Pin & 6 Pin CDI Boxes
There are two main variations of AC and DC CDI boxes used in Polaris vehicles.
Most Polaris models use a 6-pin CDI, but there are some older models that make use of a 5-pin CDI. Either way, both types are very similar and should work in your Polaris machine.
5 Pin CDI Box
The 5 pin CDI box is fitted with a male connector at the top. Inside of the connector are five pins that connect to various parts of the ignition system.
The five pins connect to the following components to provide power to the engine:
- Timing trigger (or pulse generator)
- Ignition coil
- CDI ignition power
- Kill switch (or key switch)
- Ground
6 Pin CDI Box
The 6 pin CDI box is fitted with a female connector up top containing six pins that connect to the various parts of the ignition system.
These six pins connect to the following components:
- Timing trigger (or pulse generator)
- Ignition coil
- CDI ignition power
- Kill switch (or key switch)
- Ground
- Ground
Connecting The CDI Box In Your Polaris
Most new aftermarket CDI Boxes include a kit with a new wiring harness to go along with the box, but any CDI box should connect to the original wiring harness as well.
The wiring harness should have a female connector fitted with five different wires that plugs into the male connector on the CDI box.
This is just the start though, as you’ll still need to link the timing trigger, ignition coil, CDI ignition power, kill switch or key switch and ground(s) to their respective wiring through the vehicle.
Polaris CDI Wiring Diagram
To better understand how to connect this wiring, you can refer to the Polaris CDI wiring diagrams for each CDI Box below.
I’ll also offer some detail on each of the wiring components and their colors to assist.
6 Pin Polaris DC CDI Wiring Diagram
Below is the wiring diagram for a 6 pin DC CDI box.

6 Pin Polaris AC CDI Wiring Diagram
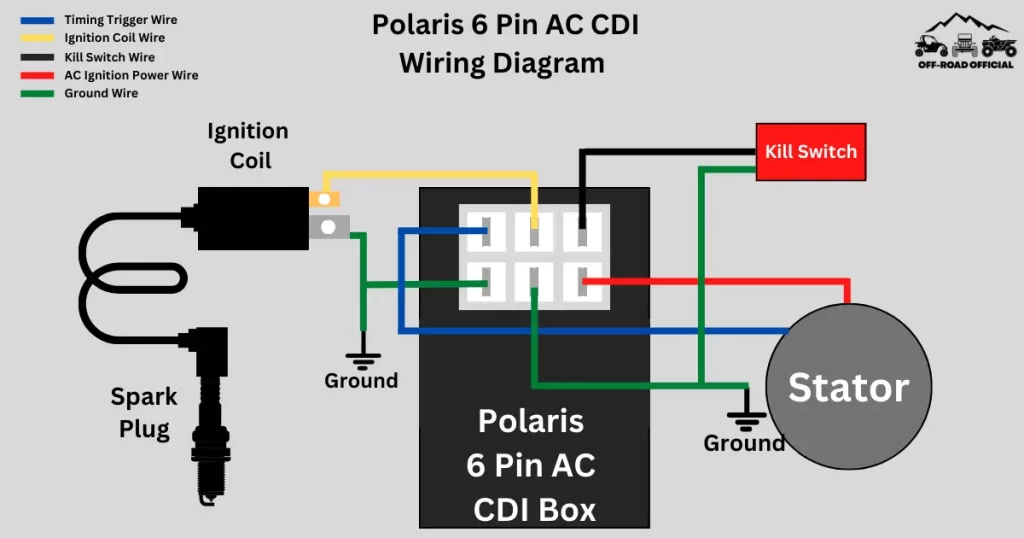
Below is the wiring diagram for a 6 pin AC CDI box.

5 Pin Polaris CDI Wiring Diagram
Below is the wiring diagram for a 5 pin CDI box.

Timing Trigger
The timing trigger is responsible for sending the initial signal to the CDI Box to let it know a spark is needed.
The timing trigger wire is usually blue or blue/white. It connects to the blue wiring on the stator.
Ignition Coil
When the signal is received from the timing trigger, the CDI box sends a current to the ignition coil. The ignition coil then routes this charge to the spark plug, resulting in a spark.
The ignition coil wire is usually yellow or yellow/black. It connects to the yellow wire on the wiring harness and then routes directly to the ignition coil.
The ignition coil also connects to a green ground wire.
CDI Ignition Power
The CDI needs power to function, and the CDI ignition power wire supplies this from either the alternator or battery depending upon the type of CDI.
This wire is usually red or red/black and connects to the stator on the engine via the wiring of the same color.
Kill Switch or Key Switch
Depending on the CDI type, wiring will run to the kill switch or key switch to turn off the engine when needed.
This wire is usually black or black/red and connects via the wiring harness, which then routes directly to the kill or key switch.
A green ground wire accompanies it at the kill or key switch.
Ground Wire
The ground wire grounds the CDI unit to the engine block or stator. It is usually green in color, but may be brown in older models.
Green ground wires also connect the wiring harness to the kill/key switch and ignition coil.
Conclusion
While replacing any component on your Polaris vehicle that requires rewiring can seem like a headache, most replacement CDI boxes these days are fairly easy to install.
Using this guide to a Polaris CDI wiring diagram, even owners with little electrical knowledge can get it done.
For more on Polaris vehicles, you may like the following articles:


