A properly jetted carburetor is one of the biggest factors in determining whether your vehicle can achieve the maximum amount of torque and power that its engine truly offers.
And if not jetted correctly, your carburetor will not function properly leading to potential engine damage and your vehicle suffering from a number of different issues.
To ensure that your carburetor is jetted correctly, this guide will assist you in explaining the following:
- Jets In A Carburetor & Their Purpose
- Pilot Jet
- Main Jet
- Needle Jet
- Air Screw
- When To Jet A Carburetor
- Signs You May Need to Jet A Carburetor
- How To Properly Jet A Carburetor
- Signs You May Need to Clean Carburetor Jets
- How To Clean Carburetor Jets
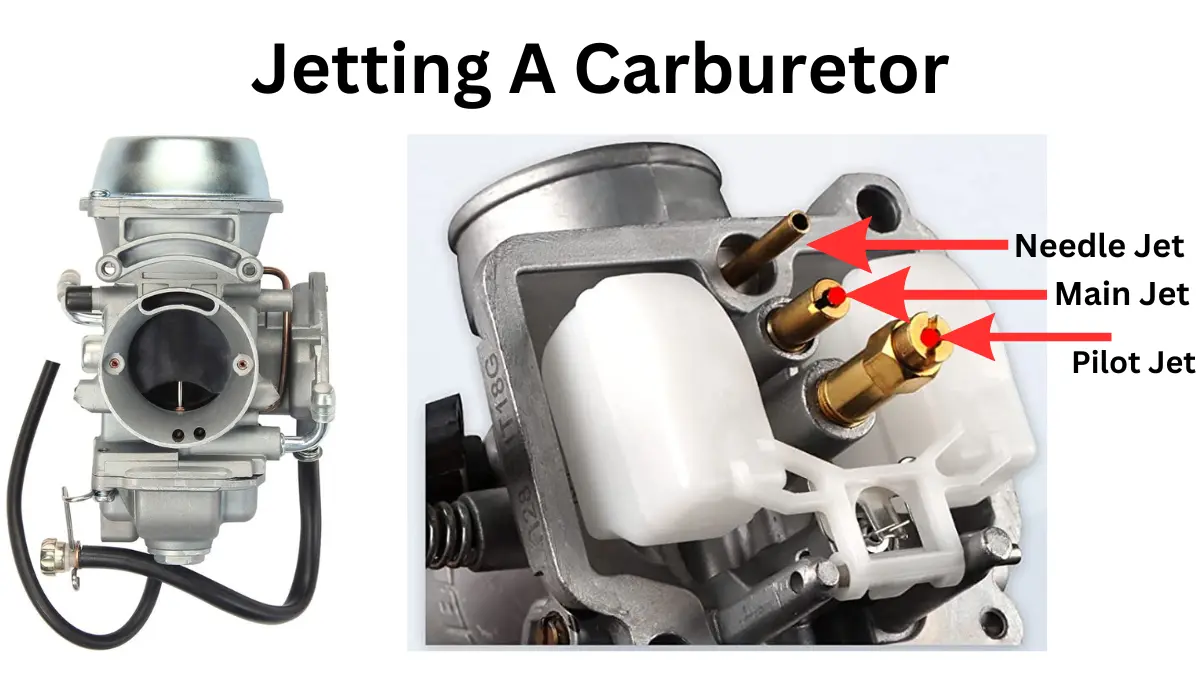
Jets In A Carburetor
Pilot Jet
The pilot jet is a brass jet located within the float bowl next to the main jet, and is the smaller of the two.
It is responsible for providing the correct amount of fuel needed to start the engine, for idling, and for throttling up to around the first 20% of the throttle range.
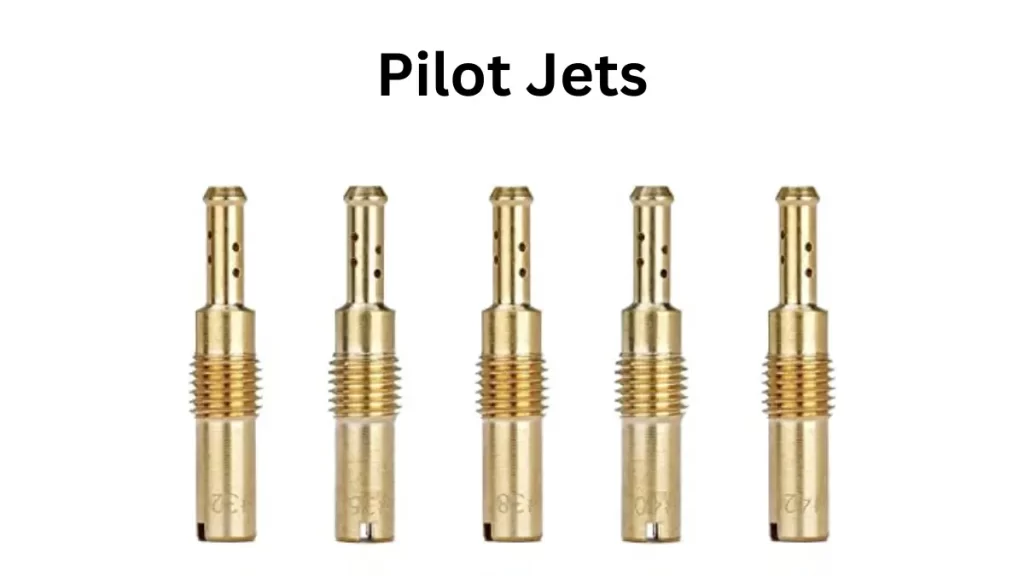
The amount of air that can mix with the fuel in a pilot jet is measured by the size of the pilot’s holes.
As air flows through the front of the carburetor and through the pilot’s holes, it creates a vacuum that draws fuel up through the pilot jet as well.
But though the pilot jet doesn’t serve as the main fuel metering jet past the initial 20% throttle range, it is always still delivering some amount of fuel to the engine regardless of throttle position.
Main Jet
The main jet is the bigger of the two jets located within the float bowl, and it is usually screwed into the needle jet.
This jet is responsible for controlling the air/fuel mix from around the 75% throttle range all the way through full open throttle at 100%.

Needle Jet
The needle jet is the most important component among the jets and controls the fuel flow between the 20% and 75% throttle ranges.
It is technically made up of two components, the needle jet and jet needle. Confused yet? I’ll explain.
The needle jet is hollow and allows the fuel to flow up through it. The jet needle pops in and out of the needle jet.
The jet needle is what actually controls the amount of fuel flow as you open and close the throttle. It moves up and down to vary the space the fuel has to flow through the needle jet, which affects the amount of fuel that makes it through as it goes up or down.

Air Screw
The air screw is a small, slotted brass adjustment screw located on the inlet side of the carburetor.
It works in conjunction with the pilot jet, mainly affecting the starting of the engine, idling, and initial power delivery when throttling up to the 20% range.
This screw allows for the carburetor to be slightly adjusted for changes in atmospheric conditions.
Signs You May Need To Jet The Carburetor
If the jets in your carburetor need to be adjusted or re-jetted, each of them will cause a number of different symptoms within your vehicle.
Here’s what to look for and how to narrow down which jet may need your attention.
Signs The Pilot Jet Needs Adjusting
If your pilot jet setting is too lean, it can cause:
- The engine to surge at low RPM levels
- The engine to bog or stall out when opening the throttle quickly
- Sputtering or stalling when idling down
If your pilot jet setting is too rich, it can cause:
- Hard starting
- Spark plug fouling at low RPM levels
- The engine sputtering as you begin to throttle
Signs The Main Jet Needs Adjusting
If the main jet is too lean, it can cause:
- Engine pinging
- The exhaust to be of a higher note than it should
- Engine overheating easier than it should
- Lack of maximum horsepower
- Engine seizures
If your main jet is too rich, it can cause:
- The engine to be flat or lazy between 75% and full throttle
- The exhaust note will be flatter than it should
- Engine sputtering at high RPM levels
- Lack of horsepower at high RPM levels
Signs The Needle Jet Needs Adjusting
If the needle jet setting is to lean, it can cause:
- Loss of low-end power
- Engine seizing under a heavy load
- Engine may run hot and seize easily
If the needle jet setting is too rich, it can cause:
- Engine sputtering around 25% throttle range
- Lack of throttle response in the 25% – 50% throttle range
- Exhaust may sound flat
When You Need To Jet Your Carburetor
If your vehicle makes use of a carburetor and you make any changes to the amount of airflow going into or out of the engine, it’s essential that you re-jet your carburetor to account for this.
Failure to do so will likely lead to damaging your engine over time.
This includes:
- Upgrading or adjusting the air intake system
- Upgrading or adjusting the exhaust system
There are also a number of engine symptoms in addition to the ones listed above that point to the need to adjust the jetting These include:
- Spark plug fouling – almost always a sign that you need to re-jet
- Swings in temperature, weather, or humidity
- Backfiring or popping sounds when decelerating
Jetting the Carburetor
The only real way to figure out the exact jetting changes your vehicle needs is by trial and error. There are multiple factors that affect the optimal jet sizes for your vehicle.
Even for vehicles of the same make and model, there is no one-size-fits-all jetting guide as it is highly dependent on factors such as driving style, geography, and more.
That said, there are processes you can follow to narrow down and identify the optimal jetting set-up for your vehicle.
Adjusting The Air Screw
Adjusting the air screw is very straightforward and can be achieved following the steps below:
- Warm up your engine to its standard operating temperature
- Turn the idle up so it’s idling around 500 RPMs higher than usual
- Turn the airscrew completely in until it bottoms out
- Once bottomed out, slowly turn the screw the opposite way ¼ turn at a time giving the engine around 15 seconds between turns so it catches up with each adjustment
- Continue this process until the engine idles at its highest RPM
The proper setting generally ends up being between one and two full turns of the air screw.
Properly adjusting the air screw will likely help you to determine the proper setting for the pilot jet as well, which I’ll detail under the Pilot Jet section below.
Unfortunately, adjusting the air screw is not set-it-and-forget-it once you find the ideal setting. You’ll likely need to re-adjust it to compensate for big changes in temperature or humidity.
The ideal air screw setting in cooler, early morning air may need to be adjusted in the afternoon heat.
Adjusting The Pilot Jet
The pilot jet is the easiest of the jets to properly set, and sometimes it may not even need adjusting.
While adjusting the air screw, you should be able to determine whether the pilot jet needs adjusting as well.
If it takes less than one full turn of the air screw for the engine to idle at its highest RPM, the pilot setting is on the lean side and a bigger pilot jet should be installed.
If it takes more than two full turns of the air screw for the engine to idle at its highest RPM, the pilot setting is on the rich side and a smaller pilot jet should be installed.
Pilot jet sizes usually come in increments of 2.5. So if your stock pilot jet is a size 25, you should go up to a size 27.5 pilot or down to a 22.5 size pilot depending upon what your air screw adjustment tells you.
It generally only takes one size up or down to find the right pilot jet fit, but you may need to try a couple of different options before landing on the best fit.
Once set, you’ll likely only need to adjust the pilot again in case of big changes in the weather/temperature or big changes in altitude of over 1,5000 feet.
Adjusting The Main Jet
The easiest and safest way to find the optimal main jet setting is by a process of trial and error.
Start by installing a main jet that is one size bigger than the main jet currently installed. Then take your vehicle for a drive.
If your engine runs fine, doesn’t lose power, and is able to rev to the highest RPM level, the bigger main jet you have installed is fine.
But to find the ideal size, you’ll need to complete this process until your engine actually does experience a loss of power and can no longer rev to its highest RPM level.
Once you find this not-so-sweet spot, you’ll know that the most recent main jet you’ve installed is too large and you should go back down to the size installed before.
As a general rule, you can add bigger and bigger main jets as long as the engine continues to run just as good or better than with the smaller size main jet previously used.
Main jets are typically offered in sizes # 90 through # 230.
Adjusting The Needle Jet
The needle jet is the most important needle to get correct as most riders spend most of their time in the 25% to 75% throttle range that the needle jet affects.
Many times the needle jet will not need much, if any, adjusting after properly adjusting the air screw, pilot jet, and main jet.
The easiest way to determine if an adjustment is needed is to mark the throttle grip at the 25% and 75% openings and then drive your vehicle between those two marks.
If you experience your vehicle briefly bogging before responding to throttle in these ranges, you likely need an adjustment.
The most common adjustment the needle jet may need is to its length, which is determined by the clip position setting within the grooves located at the top of the needle.
Simply lower the clip of your needle a notch at a time until the throttle response is no longer delayed in this throttle range.
When To Clean Jets In A Carburetor
If you experience any of the tell-tale signs of an issue with your carburetor, there’s a good chance you need to clean the jets in your carburetor.
Signs of this include:
- Engine sputtering or stalling
- Engine surging
- Rough idling
- Engine refusing to start or run without the choke
Both the pilot and main jets are particularly susceptible to becoming clogged and gummed up over time, and cleaning them should help to alleviate these issues.
How To Clean Jets In A Carburetor
To clean the jets in your carburetor, you’ll first need to remove the carburetor and disassemble it to access them.
Once disassembled, you’ll find the jets located within the fuel bowl.
Remove them and inspect them to see if you are able to look through one end and see clear through to the other side.
If not, they are likely plugged and this is likely your issue.
To unplug them, stick a piece of fine wire through them and unplug them of any gunk or debris.
Then, spray through them with a Carburetor Cleaner afterwards.
Once they have been cleaned and unplugged, reinstall them and reassemble your carburetor, and you should be good to go.
Conclusion
While properly jetting a carburetor is no simple task and will take some time and effort, this guide should make it easier on you and help save you some time.
For more on carbureted ATVs and UTVs, check out the following guides before you go: